Water is the bloodstream of a hydroponic system. Unlike soil farming, where nutrients are buffered by the soil itself, hydroponics depends entirely on the quality, balance, and freshness of the nutrient solution. Change water in a hydroponic system is not just a maintenance task, it’s a crop health decision.
This article explains why, when, and how to change water in a hydroponic systems, covering small home setups and commercial farms, plus what not to do and how to dispose of used nutrient water responsibly.
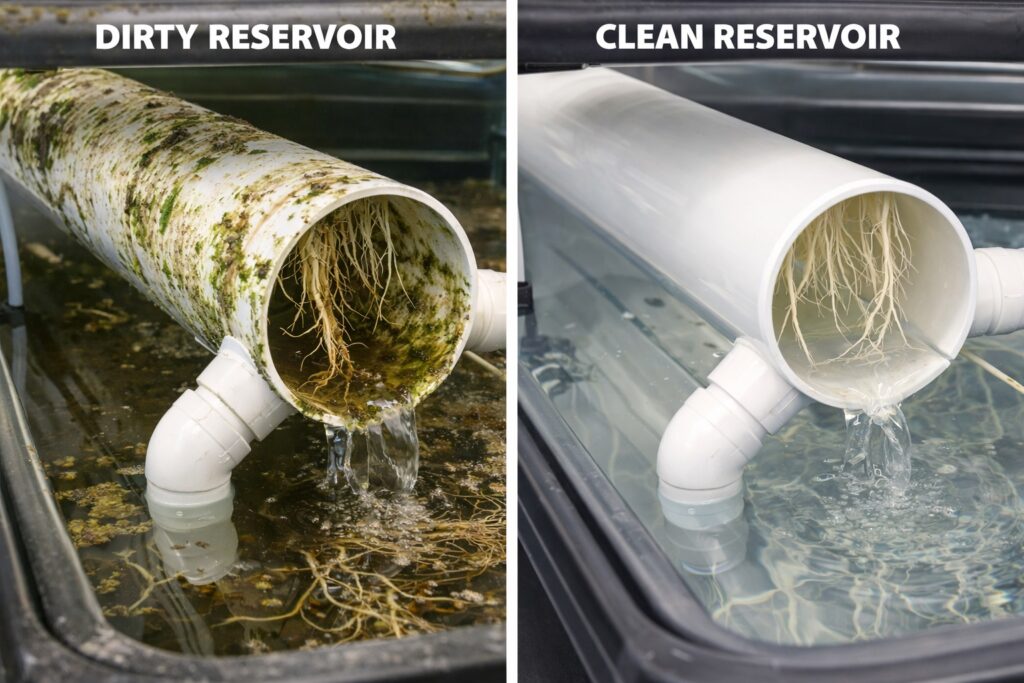
Why Regular Hydroponic Reservoir Maintenance is Critical
In a soil-less environment, the water is the only life-support system your plants have. Unlike traditional farming where soil acts as a natural filter, a hydroponic reservoir is a closed loop.
Over time, the chemistry of this “bloodstream” shifts away from its ideal state due to following reasons.

- Selective Nutrient Uptake: Plants don’t drink nutrients at the same rate. They might finish all the Nitrogen but leave the Zinc behind. Over time, this creates a toxic “imbalance” that a simple top-up can’t fix.
- EC Creep (Salt Buildup): As plants drink water, the concentration of unused mineral salts rises. This “EC creep” makes it harder for roots to pull in moisture, eventually leading to “nutrient lockout.”
- pH Drifting: As nutrients are consumed, the chemical balance of the water changes, causing the pH to swing. This prevents the plant from “seeing” the food that is actually available in the water.
- Pathogen & Biofilm Growth: Stagnant or aging water becomes a breeding ground for Pythium (root rot) and algae. Regular flushes physically remove these pathogens before they can colonize your root zone.
Topping up with water helps, but it does not reset nutrient balance. Only a proper water change does.
For commercial growers, maintaining this stability isn’t just about plant health—it’s about protecting your ROI (Return on Investment).
How Often to Change Hydroponic Water? (By System Type)
Complete system flush means draining 100% of the reservoir and scrubbing the tank. For a commercial or high-standard setup, a complete change is your insurance policy against crop failure.
When Should You Do a Full Flush?
Beyond scheduled maintenance, you must perform an immediate full flush if your EC climbs unexpectedly, pH becomes unstable, or you notice the “red flags” of root stress and biofilm buildup.
- Chemical Triggers (Trust the Sensors):
- ✔ EC rises more than 0.2 without nutrient addition
- ✔ pH drifting daily or unstable (Can not Stay stable for more than 12 hours)
- Visual Triggers (Trust Your Eyes)
- ✔ Roots turning brown or “slippery” (early signs of Pythium).
- ✔ Salt crust forming on the edges of the reservoir or net pots.
- ✔ Water becomes cloudy or develops a “foamy” surface.
- Its time for Reset
- ✔ Crop change or system reset
- ✔ After 2–8 weeks (system dependent)
Complete Reservoir Flush Frequency
| Hydroponic System | Complete Flush Cycle | Primary Reason for Full Change |
|---|---|---|
| DWC (Deep Water Culture) | 7 – 10 Days | Prevents nutrient antagonism and rapid pH swings in direct-root contact water. |
| Aeroponics | 7 Days | Critical to prevent salt crystallization and clogging of high-pressure misting nozzles. |
| NFT (Nutrient Film) | Every 10 – 14 Days | Eliminates salt concentration spikes caused by high evaporation rates in the film. |
| Vertical Towers | 10 – 14 Days | Ensures anaerobic bacteria do not build up in gravity-fed "dead zones." |
| Ebb & Flow (Flood & Drain) | 14 – 21 Days | Flushes out residual salts that accumulate on porous growing media like clay pebbles. |
| Dutch Buckets | 21 Days | Higher water volume provides stability; usually used for large, heavy-feeding plants. |
Why a "Complete Change" is Different from a "Top-Up"
While “topping up” merely dilutes existing problems, a complete water change is the only way to physically remove accumulated salt deposits, toxic root exudates, and microbial biofilms that compromise crop health.
- Removing Non-Absorbed Elements: Plants don’t eat everything. Sodium or chloride from your source water can build up to toxic levels. A top-up just dilutes them; only a complete change removes them.
- Biofilm Destruction: Bacteria create a “slime” (biofilm) on the walls of your reservoir. A complete change allows you to scrub these surfaces with a 2% Hydrogen Peroxide ($H_2O_2$) solution.
- Root Exudates: Plants “sweat” organic compounds into the water. In a closed loop, these can eventually become food for pathogens like Pythium.
How to Flush a Hydroponic System: A Step-by-Step Guide
Follow this SOP to ensure a safe transition for your plants.
Phase 1: Pre-Flush Preparation: Tools & Safety
Before you drain a single drop, ensure you have these three pillars of preparation in place. Failing to prepare can lead to wilting or “nutrient shock” if the transition is too abrupt.
System & Crop Safety
- Select the Right Time: Schedule flush during low plant stress period (early morning or evening). Avoid flushing during peak light/heat when transpiration is highest.
- Ensure water supply: Ensure you have enough dechlorinated water is ready to fille the entire reservoir.
- Disable Automation: For Smart hydroponic farm disable all automated operations like dosing, pump etc.
Water Quality Check
- Baseline Measurements: Record the Source water EC and pH values. You will require these values while making nutriant solution.
- Water Temperature: Make sure water temperature is in between 18–22 °C (leafy). Using a heated or cold water can shock your plants.
- Dechlorination: Make sure your water free from chlorine (or dechlorinated).
Tools & Consumables
- Submersible Pump & Hose: You will need this for draining the water from reservoir.
- Cleaning Kit: A Soft brush or sponge (non-metal) and Food-grade sanitizer (if needed), PPE (gloves, goggles for commercial)
- Calibrated Meters: Make sure you EC & pH meters calibrated with the buffer solution.
- Log Book: For maintaining logs for all parameters either on paper or digitally.
Phase 2: Execution (The Flush)
Step 1: System Shutdown
Turn off all pumps, aeration, and dosing systems.
- Stop nutrient dosing
- Switch off circulation pumps
- Switch off aeration (DWC)
- Close irrigation valves (drip systems)
Step 2: Drain the Reservoir
Pump out 100% of the old solution.
- Drain reservoir completely
- Collect runoff for reuse or disposal
- Measure EC of drained solution (log it)
- Inspect solution color & odor
Root Zone Rinse (Critical)
- Run clean water through system (no nutrients) for following duration:
- NFT / Aeroponics: 10–15 min
- DWC: 5–10 min
- Ebb & Flow: 1–2 flood cycles
- Drip: 1 full irrigation cycle
- Observe root color improvement
- Drain rinse water completely
Step 4: Mechanical Cleaning
Mechnical Cleaning involves cleaning the Reservoir and other system components such as Pump, Filters, Air stones, or any clogging in the system. This process involves some of the following steps:
- Rinse reservoir and complete system with clean water
- Remove sediment and salt crust
- Clean corners, pump inlets, pipe entries
- Use a soft sponge and 2% Hydrogen Peroxide to scrub the reservoir walls.
Phase 3: Refill and Restart
Step 5: Fresh Water & Nutrients
Fill with fresh water first, then add nutrients in the specific order (usually Micro, then Grow, then Bloom).
Step 6: Final Balancing
Adjust your pH only after the nutrients are fully mixed and the EC is stable.
Step 7: Monitor
Watch for wilting or leaks for the next 60 minutes.
Hydroponic System-Specific Flush Notes
NFT
- Flush entire channel length
- Check slope and stagnant zones
- Inspect root mat thickness
DWC
- Clean tank walls thoroughly
- Verify dissolved oxygen after restart
- Replace damaged air stones
Ebb & Flow
- Flush grow media separately if reusable
- Remove salt deposits from trays
Drip (Recirculating)
- Flush main lines + laterals
- Clean return channels
- Test dripper uniformity
Aeriation
- Mandatory filter cleaning
- Check nozzle spray pattern
- Run plain water mist test
Refill and Restart Checklist
Nutrient Refill
- Fill reservoir with fresh water
- Add nutrients in manufacturer order
- Mix thoroughly
- Set EC to target crop range
- Adjust pH last
System Restart
- Restart circulation pump
- Restart aeration
- Restart irrigation cycles
- Observe for leaks or airlocks
- Monitor plants for 30–60 min
Post-Flush Monitoring (Next 48 Hours)
- EC stable (±0.1–0.2)
- pH drift <0.3 per day
- Roots appear white / cream
- No nutrient precipitation
- No unusual plant wilting
Dispose Used Hydroponic Water Responsibly
- Dilute old solution if EC >2.5
- Reuse on soil plants or trees
- Avoid storm drains & natural water bodies
- Log disposal volume (commercial compliance)
- Consider reuse for non-food crops
Common Mistakes to Avoid During a Water Change
Avoiding these frequent errors ensures that your water change actually helps your plants instead of shocking them:
- ❌ Using Water at the Wrong Temperature: Flushing with ice-cold or hot water can cause immediate “root shock,” leading to wilting. The Fix: Ensure your refill water is between 18–22°C.
- ❌ Skipping the Root Zone Rinse: Simply changing the reservoir water leaves old salts trapped in the growing media (like clay pebbles or coco coir). The Fix: Always run plain water through the lines for 10 minutes before adding new nutrients.
- ❌ Using Household Cleaners: Soap, bleach, or dish detergent residues are toxic to plants and can ruin a whole crop. The Fix: Use only 2% Hydrogen Peroxide or food-grade sanitizers.
- ❌ Neglecting the EC & pH Calibration: Never assume your “standard recipe” will result in the same levels every time. The Fix: Always calibrate your meters and check the final solution before restarting the pumps.
- ❌ Leaving Algae in the Pipes: Cleaning the tank but ignoring the delivery lines allows pathogens to re-infest the new water instantly. The Fix: Flush the entire system, not just the reservoir.
- ❌ Improper Disposal of Waste Water: Dumping concentrated nutrient water into storm drains can harm local ecosystems. The Fix: Dilute and reuse it for your soil-based garden or trees.
FAQs: Expert Tips for Cleaner Nutrient Solutions
Can I just top up the water instead of a full change?
Topping up only replaces evaporated water; it does not remove non-absorbed elements or root exudates. According to our guidelines, a complete change is necessary to “reset” the nutrient balance and destroy biofilms that accumulate on reservoir walls, which a simple top-up cannot do.
How often should I perform a full system flush?
Frequency depends on your specific system. For example, DWC systems require a flush every 7–10 days due to direct root contact, while Dutch Buckets can go up to 21 days. Refer to our above to see the specific cycle for NFT, Aeroponics, and Vertical Towers.
What are the "red flags" that I need an immediate water change?
You should perform an emergency flush if you notice EC rising without adding nutrients, pH drifting daily, or if the solution has a foul odor, cloudiness, or visible slime (biofilm). These are signs of salt buildup or microbial pathogens.
Is a root zone rinse necessary during every water change?
Yes. A critical step in our SOP (Standard Operating Procedure) is running clean water through the system (without nutrients) for 5–15 minutes. This flushes residual salts directly from the root mat and grow media, ensuring your plants start fresh.
What is the best way to dispose of used nutrient water?
Don’t let it go to waste! You can reuse it on soil-based plants or trees, as they can buffer the remaining nutrients. However, avoid dumping it into storm drains or natural water bodies to remain environmentally responsible and compliant with commercial standards.
Should I use household cleaners to sanitize my reservoir?
Never use soaps or detergents. These can leave residues that are toxic to plants. Instead, use a 2% Hydrogen Peroxide solution or a food-grade sanitizer. This effectively kills pathogens without harming your next crop cycle.